Posts

Showing posts from 2012

Disable T5120 RAID - Cause failure in booting/installing from HD

-> start /SP/console Are you sure you want to start /SP/console (y/n)? y Serial console started.  To stop, type #. {0} ok show-disks a) /pci@0/pci@0/pci@8/pci@0/pci@9/LSILogic,sas@0/disk b) /pci@0/pci@0/pci@2/scsi@0/disk c) /pci@0/pci@0/pci@1/pci@0/pci@1/pci@0/usb@0,2/hub@4/device@4/storage@0/disk q) NO SELECTION Enter Selection, q to quit: c /pci@0/pci@0/pci@1/pci@0/pci@1/pci@0/usb@0,2/hub@4/device@4/storage@0/disk has been selected. Type ^Y ( Control-Y ) to insert it in the command line. e.g. ok nvalias mydev ^Y          for creating devalias mydev for /pci@0/pci@0/pci@1/pci@0/pci@1/pci@0/usb@0,2/hub@4/device@4/storage@0/disk {0} ok boot /pci@0/pci@0/pci@1/pci@0/pci@1/pci@0/usb@0,2/hub@4/device@4/storage@0/disk -s Boot device: /pci@0/pci@0/pci@1/pci@0/pci@1/pci@0/usb@0,2/hub@4/device@4/storage@0/disk  File and args: -s

How To Reset The ALOM Password On A Sun Fire T2000

If an  ALOM password reset  is required on a Sun Fire T1000 or  Sun Fire T2000  in case the password is lost or forgotten, the following steps can be taken to erase the ALOM NVRAM so that a user can gain access to it, set a new password and restore the NVRAM settings. Note: Access to the server’s power cables and the ALOM serial port is required for this procedure. Connect your computer or laptop to the ALOM serial management port. Power cycle the system by unplugging the server’s power supplies, waiting several seconds and then plugging the power back in. You should see the ALOM booting on the serial management console. Hit “Esc” during the ALOM boot, before or at the point where the display says: Return to Boot Monitor for Handshake The system will return with this message: Return to Boot Monitor for Handshake ESC keypress detected. The ALOM enters the “ALOM boot escape menu”. The following choices will be displayed: ALOM  Menu e - Erase ALOM NV

Installing Net-SNMP on Solaris OS

Introduction: Sun OS versions previous to Solaris10 come configured with the Sun SNMP agent. Solaris has started shipping Net-SNMP with Solaris10 as an alternative to the Sun SNMP agent, this guide is designed to offer a road-map for installing Net-SNMP on versions older than Solaris10 so that users can utilize both the inclusion of the HOST-MIB Tree (Disk and CPU monitoring) and the use of SNMPv3 (encryption of SNMP traffic over a network) within these previous OS's (capability unavailable in the Sun SNMP agent). Check For Sun SNMP Agent: Before we start we need to check for the existence of the Sun SNMP agent and turn it off if it is running. To do so run the following command from the command line: Code: ps -ef | grep snmp

How to Upgrade to Perl 5.12.5 on Linux Machine

Upgrading Perl from source on Linux This tutorial explains how to compile Perl 5.12 for a Linux machine. In this tutorial, CentOS 5 / Red Hat Enterprise Linux 5 will be used, however the procedure should be quite similar for other distributions of Linux as well. Note:  You may be tempted to do a `yum remove perl` to remove the 5.8 version that your distribution came with. Don't. I'll give an explanation why later on. Does your vendor already have Perl 5.12? If you can install Perl 5.12 via yum, apt, portage, or whatever your package manager is, I highly recommend you do it. It's always better to install things so that your package manager is aware of their existence rather than to go ahead and install something behind its back. If all you can get is Perl 5.8, though, you'll need to compile it yourself. Download the Perl Source Just link to  http://search.cpan.org/dist/perl/  and click the "Download" link at the top of the page. That should get you th

Year 2038 problem

Image
The  year 2038 problem  may cause some computer software to fail at some point near the year 2038. The problem affects all software and systems that both store system time as a signed 32-bit integer, and interpret this number as the number of seconds since 00:00:00 UTC on Thursday, 1 January 1970. [1]  The furthest time that can be represented this way is 03:14:07 UTC on Tuesday, 19 January 2038. [2]  Times beyond this moment will "wrap around" and be stored internally as a negative number, which these systems will interpret as a date in 1901 rather than 2038. This is caused by integer overflow. The counter "runs out" of usable digits, "increments" the sign bit instead, and reports a maximally negative number (continuing to count  up , toward zero). This is likely to cause problems for users of these systems due to erroneous calculations. Further, while most programs will only be affected in or very close to 2038, programs that work with future dates

How to restrict FTP user to a specific directory in solaris 10

Procedure to configure FTP guest user access  1: Create a user which you want to use for the ftp , Name of the user can be anything except "ftp" ( In our Example it is "ftpuser") Useradd -g 10 -d /export/home/ftpuser -m -s /bin/bash ftpuser passwd ftpuser Enter the new password twice . 2: Run the "ftpconfig -d" command , on the home directory of newly created user.  # ftpconfig –d /export/home/ftpuser this updates the existing directory with the info needed to make the account restricted. After this you can see some extra directories in /export/home/ftpuser e.g bin, dev,lib e.t.c  3: Add the user to the /etc/ftpd/ftpaccess file. There is an existing commented entry  # guestuser username that can be uncommented and edited  guestuser ftpuser 4: Confirm that the user is a member of a class in /etc/ftpd/ftpaccess this entry should a already exist in ftpaccess class guestusers guest * 5: Modify permissions for guest user if necessary d

Configuring NTP Server & Client in Solaris 10

Configuring  NTP ( Network Time Protocol) on Solaris 10 Configuring an NTP Server  1. Edit file ntp.conf bash > cp / etc / inet / ntp.server / etc / inet / ntp.conf bash > vi / etc / inet / ntp.conf Add server address for ntp server server 1.id.pool.ntp.org server 1.asia.pool.ntp.org server 3.asia.pool.ntp.org broadcast 224.0.1.1 ttl 4   enable auth monitor driftfile /var/ntp/ntp.drift statsdir /var/ntp/ntpstats/ filegen peerstats file peerstats type day enable filegen loopstats file loopstats type day enable filegen clockstats file clockstats type day enable   keys /etc/inet/ntp.keys trustedkey 0 requestkey 0 controlkey 0 Save your change configuration 2. Refresh daemon NTP bash > touch / var / ntp / ntp.drift bash > svcadm enable svc: / network / ntp

Configure VNC session to persist after exiting the VNC client

In My last Post we have learn how to install & configure a VNC server with GDM on a Solaris 10 OS. We will see in this post How to Configure a VNC session to persist even after exiting the VNC client. This may or may not be desirable for you, but if you want the VNC session to persist if you exit the VNC client then do the following: #  svccfg -s xvnc-inetd svc:/application/x11/xvnc-inetd>  editprop This take you into a vi session. Look for the line... #setprop inetd/wait = boolean: false Copy the line, uncomment it and set it to true. Save the file, exit svccfg and run the command... #  svcadm refresh xvnc-inetd Connect again with you VNC client. Now, when you exit/kill the VNC client, the session on the server will persist and you will be able to connect to it again.

How to Install & Configure VNC Server with GDM on Solaris10

VNC ( Virtual Network Computing) is a way to access and control the desktop of a remote computer. For this functionality the remote computer must be running VNC server software. The OpenSolaris 2008.05 binary distribution or Solaris10 Companion CD includes the SUNWxvnc package for the Solaris operating system. Once this package is installed, you can connect to the Solaris operating system from any other operating system that has a VNC client installed. alternatively you can download SUNWxvnc package from below link http://en.sourceforge.jp/projects/sfnet_solarispackages/downloads/solaris10-508-x86_packages/SUNWxvnc.tgz 1. Check that the VNC Server is Installed This should be present as it is part of the 2008.05 binary distribution, but I checked anyway. #  pkg info SUNWxvnc           Name: SUNWxvnc        Summary: X11/VNC server          State: Installed      Authority: opensolaris.org (preferred)        Version: 4.1.2  Build Release: 5.11         Branch:

Introduction-to-PPPoE

PPPoE  stands for  Point-to-Point Protocol over Ethernet . It is a network protocol sometimes used by Broadband Modems  for DSL  Internet service. PPPoE allows Internet Service Providers to manage access to accounts via user names and passwords. DSL service providers began using PPPoE many years ago, as it proved a convenient technical solution for converting subscribers from dial-up Internet. While convenient for service providers, some customers of PPPoE-based Internet service have experienced problems with their connection due to incompatibility between PPPoE technology and their personal network firewalls. Contact your service provider to verify whether they use PPPoE and get any assistance needed with your firewall settings. The PPPoE protocol specification is Internet RFC 2516. look at this introductory paper  Introduction-to-PPPoE.pdf

Introduction to Multilink PPP - MLP

Multilink PPP (MLP), as defined in RFC 1990, is a variant of PPP used to aggregate multiple WAN links into one logical channel for the transport of traffic. It enables the load-balancing of traffic from different links and allows some level of redundancy in case of a line failure on a single link. Multilink PPP (MP) or (MLP) provides an approach to increasing bandwidth. It allows multiple PPP links to form an MP bundle. After receiving a packet, MP segments (if the packet is large) the packet into fragments and distributes them over multiple PPP links to the remote end. After the remote end receives these fragments, it assembles them into a packet and passes the packet to the network layer. MP functions to: l          Increase bandwidth, or dynamically increase/reduce bandwidth in combination with dial control center (DCC) l          Load sharing l          Backup l          Decrease transmission delay through fragmentation MP can work on any physical or virtual

Introduction to Point to Point Protocol (PPP)

Introduction to Point to Point Protocol (PPP) PPP is the Internet Standard for transmission of IP packets over serial lines. PPP supports async and sync lines. For a general discussion of PPP , look at this introductory paper Introduction-to-Point-to-Point-Protocol-(PPP).pdf Contents Point-to-Point Protocol (PPP): 1 I. PAP authentication . 1 Figure 1 PAP Authentication . 2 II. CHAP authentication . 2 Figure 2 CHAP Authentication . 3 III. Operating mechanism of PPP . 3 Figure 3 PPP operation flow chart  

How to format virus infected and unformattable Pen drives

Stuck in a thought why your USB Pen drive not formatting??? check this tutorial on "How to format virus infected and unformattable Pen drives" How to format virus infected and unformattable Pen drives -

Initial Setup of a Netgear Dual-Band Router

Image
This tutorial is about configuring a Netgear Dual Band router connected to a Cable Modem. Also, the SSIDs and pass-phrases on the images are fictitious. Note:  The Wi-Fi Protected Setup (WPS) using the push button dome on the router won’t be included in this tutorial as this tutorial is written to be easier to follow. First Option  – How to setup your Netgear dual band router by using a pre-configured setting. If you’d like a hassle-free guide to setup your Netgear dual band router, you may follow this procedure. To begin, unplug the power cable to turn off your modem. Connect the Ethernet cable to the router’s Internet port. Turn on or plug-in the power cable of the modem. Connect the power adapter to the router to turn it ON. Connect your computer to the router by using an Ethernet cable plugged in to the router’s Ethernet port. Wait for all the lights to be stabilized.

Dual boot Windows XP over Windows 7 installation guidelines

Image
In this post you will learn  ‘How to install Windows 7 and Windows XP as  dual boot ’  with  Windows 7 as first installation . This case is applicable for users who have Windows 7 pre-installed on ‘C’ and want to install XP on their ‘D’ partition. The process for this is very simple . Follow the steps below to  install XP after Windows 7 . 1) Make a fresh Install of Windows XP on ‘D’ partition of your hard drive. Assuming, Windows 7 is installed on ‘C’ partition.

JNCIA-JNCIS-JNCIP Training Videos

I found the following JRE videos that seem to be helpful as well. Routing Summer School Videos based on OJRE Student Guide material Session 1 Chapters 1, 2 and 3 OJRE Student Guide Chapter 1: Course Introduction Chapter 2: Juniper Networks Enterprise Routers Chapter 3: JUNOS User Interfaces http://j-central.emea.acrobat.com/p93557643/ Session 2 Chapters 4 and 5 OJRE Student Guide Chapter 4: Installation and Initial Configuration Chapter 5: Operational Monitoring and Maintenance http://j-central.emea.acrobat.com/p98134620/ Session 3 Chapter 6 and 9 OJRE Student Guide plus some additional topics/concepts • Chapter 6: Routing Protocols and Policy • Chapter 9: Miscellaneous Features http://j-central.emea.acrobat.com/p57069833/ Session 4 Chapters 7 and 8 OJRE Student Guide • Chapter 7: Link-State Protocols - OSPF • Chapter 8: Services https://admin.emea.acrobat.com/_a830383408/p166860 42/

Solaris-10 md5 checksum verify

How to Verify md5 checksum on Solaris 10 ? md5sum package is available in the Solaris 10 companion CD. But even if the SFWcoreu package not installed on your machine, you can still verify/calculate md5 sum using the following: Solaris 9 ## Full Format [ root @ server:~ ] # cksum /dev/null 4294967295 0 / dev / null   ## Only display the checksum [ root @ server:~ ] # cksum /dev/null | cut -f1 4294967295

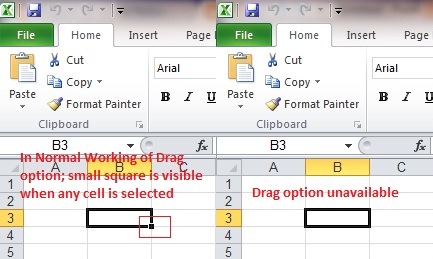
Restore click and drag feature in excel- how to restore fill handle

Image
Recently one of my follower asked me, that he can not use the Microsoft Excel 'click & drag' feature to fill column and cells with sequential or related data. He was using excel in built list & custom list  for filling up date, Month & serial numbers.He was struggling and has to enter each data manually. This happens with users who click in Excel setting options without knowledge & forget to restore. This problem caused due to disabling of 'fill handle and cell and drag drop' function.

Fix BOOTMGR is Missing Error in Window 7 or Vista

BOOTMGR Error Message There are few ways that the "BOOTMGR is missing" error may show up on your computer, with the first error I have listed being the most common: "BOOTMGR is missing Press Ctrl Alt Del to restart" "BOOTMGR is missing Press any key to restart" "Couldn't find BOOTMGR" The "BOOTMGR is missing" error displays shortly after the computer is turned on, immediately after the Power On Self Test (POST) is complete. Windows 7 or Windows Vista has only initially started to load when the BOOTMGR error message appears. Causes of BOOTMGR Errors There are a number of possible causes for BOOTMGR errors, including the most common "BOOTMGR is missing" error message. The most common reasons for BOOTMGR errors include corrupt and misconfigured files, hard drive and operating system upgrade issues, corrupt hard drive sectors, an outdated BIOS, and damaged or loose IDE cables. Another reason you might see BOOTM

Windows7-Disable Automatic Restart on System Failure

Image
Automatically Restart on System Failure Option in Windows 7 Windows 7 is configured by default to restart immediately after a Blue Screen of Death (BSOD) or other major system problem. This reboot usually happens too fast to see the error message on screen. Follow these simple steps to disable the automatic restart feature for system failures in Windows 7. Important: Unable to boot completely into Windows 7 due to the BSOD? See Tip #2 at the bottom of this page for help. Difficulty: Easy Time Required: Disabling the Automatic Restart option in Windows 7 usually takes less than 10 minutes

Disable Error Reporting in Windows 7

Error reporting is enabled by default in Windows 7. You might want to disable error reporting for privacy concerns, if you're not connected to the Internet all the time, or maybe just to stop being annoyed by the alerts. Error reporting works by prompting you after a critical error in the Windows 7 operating system or in other programs and then notifying Microsoft about it. This way, Microsoft can gather technical information about serious errors from millions of PCs which helps them develop patches and service packs. See the easy steps below if you'd like to disable error reporting in Windows 7: Difficulty: Easy Time Required: Disabling error reporting in Windows 7 usually takes less than 5 minutes

Windows 7 Slow Performance. How to Fix it..

Image
Windows 7 consume high memory for its resources. It features many visual effects that draw heavy on your graphics card and system memory. If your system was slow out of the box, chances are you can easily fix that by turning off superfluous effects. Go to > Start and type ‘ performance ‘ in the search field. Select > ‘ Adjust the appearance and performance of Windows ‘ from the results. The > Performance Options window will open. Under > Visual Effects select > Adjust for best performance . If you would like to retain a nice interface, select > Custom and check > ‘ Use visual styles on windows and buttons ‘.

'Unable to perform the operation' Error Occurs when Accessing Printer Services in Windows XP (HP Printer)

Image
For HP printer when Accessing Printer Services in Windows XP  'Unable to perform the operation' Error Occurs.   Issue An 'Unable to perform the operation ' error message displays on the computer when you attempt to access printer services on a computer running the Firefox Web browser in Windows XP. Cause This error occurs because older versions of the product software are incompatible with the Firefox Web browser.

How SNMP Works

Image
In this section we see. · SNMP Architecture · SNMP Manager/Agent Communication · SNMP Management Systems and Agents · SNMP Messages Use Simple Network Management Protocol (SNMP) management software to monitor any network device configured with SNMP agent software. The SNMP agent, which is an optional component of Windows Server 2003, interacts with third-party SNMP management software to enable the flow of network status information between monitored devices and applications and the management systems that monitor them. You can use SNMP in environments that include large networks with hundreds or thousands of nodes that would otherwise be difficult and costly to monitor. SNMP allows monitoring of network devices such as servers, workstations, printers, routers, bridges, and hubs, as well as services such as Dynamic Host Configuration Protocol (DHCP) or Windows Internet Name Service (WINS). The following sections describe the architecture, components, and processes us

What Is SNMP...?

Image
Simple Network Management Protocol (SNMP) is a popular protocol for network management. It is used for collecting information from, and configuring, network devices, such as servers, printers, hubs, switches, and routers on an Internet Protocol (IP) network. Microsoft Windows Server 2003 provides SNMP agent software that works with third-party SNMP management software to monitor the status of managed devices and applications. Automating Network Management Large networks with hundreds or thousands of nodes are difficult to manage without a large staff to monitor every computer. SNMP, which is widely used in local area networks (LANs), lets you monitor network nodes from a management host. You can monitor network devices such as servers, workstations, printers, routers, bridges, and hubs, as well as services such as Dynamic Host Configuration Protocol (DHCP) or Windows Internet Name Service (WINS).

Network Monitoring Technologies

In Microsoft Windows Server 2003 network monitoring technologies help network administrators track and manage the functions of devices on the network. Network Monitoring Components There are two network monitoring technologies that help network administrators track and manage the functions of devices on the network: Simple Network Management Protocol (SNMP) SNMP is a network management protocol that can monitor and alert administrators regarding the condition of hardware components such as workstations and servers. Microsoft Computer Browser Service The Computer Browser Service in computers running Windows enables network administrators and users to browse and gain access to the resources of the network. The browser service provides a convenient listing of devices such as workstations and printers, and allows network users access to them with the proper authentication.

DNS registration changes for Windows Server 2003 based DHCP Servers

When the DHCP Server role is installed on a domain controller, the DHCP Server inherits the security permissions of the domain controller. To prevent possible misuse of the domain controller’s elevated permissions, DHCP Servers that are installed on Windows Server 2003 do not register DNS records on behalf of the clients that are associated with the DHCP Server unless the DHCP Server is explicitly configured with DNS credentials. This behavior prevents a potential escalation of privilege to clients of the DHCP Server. Configuring DNS credentials on a DHCP Server that is running Windows Server 2003 Follow these steps to configure the DNS credentials of a DHCP Server that is installed on a domain controller running the Windows Server 2003 operating system: Start the DHCP management console. Click Start , then click Run and type dhcpmgmt.msc . In the DHCP navigation pane, expand the server node and right-click IPv4 , and then click Properties . In

Windows7 DVD with Service Packs Hotfixes

Image
How to create a custom  Windows7 DVD with Service Packs Hotfixes included In this guide, you will learn how to create your customized Windows 7 setup, using the autounattend.xml setup answer file your created on Customize Windows 7 Deployment guide . Do you want to build a Windows 7 DVD which is pre-configured to your needs, saving valuable setup time? Do you want to include other programs, the latest setup hotfixes and service packs?   Whatever your needs are, read on to learn more from our website who will teach you step-by-step creation of your customized Windows 7 DVD! Step-by-Step creation of custom Windows 7 DVD Pre-Requisites Windows 7 Customized setup folder on your Hard Disk (e.g. C:\Windows7) (e.g. A copy of your original Windows 7 DVD on your Hard Disk) CD Image GUI (free) by CyBerian. (Download  here ); ISO Buster (free)  to extract your Windows 7 DVD Boot Image; Optionally, an  Autounattend.xml file  created in your Windows Automated Installati